


AK
-
Posts
138 -
Joined
-
Last visited
-
Days Won
13
Content Type
Profiles
Forums
Gallery
Events
Articles
Media Demo
S30z Register
Store
Everything posted by AK
-
I brought a BRE Rear Spoiler and the front BRE SPOOK Air Dam from the states after several email checking spec and confirming they would fit my 260z 2+2 they arrived and the looked great. But unfortunately, the Spook front air dam did not fit my Datsun as promised - but not one to surrender so easily as sending it back to the states for a credit would not be worthwhile because of the cost of freight. After taking a lot of measurements and playing around with would be the optimal position I surmised that cutting the air dam in half and making a matching plate for the underneath center section and spreading the width by 100mm I should be able to get it to fit well. First I made a mold of the underside with about 4 layers of fiber glass, this would be the center strengthening plate to join the two halves. Once done I went to town cutting up the expensive BRE SPOOK Air Dam in half, once in two I did a test fit of the two halves while on the car, then I did a temporary join of the two pieces with my center fiber glass section. All worked pretty perfect actually, used a strong glue for the two halves and the actual bolting of the Air Dam to Valiance also keeps the two halves together as they bolt through the strengthening plate. The 100mm wide surface gap I filled with a 4mm thick 100mm wide strip of black rubber which looked pretty good once fitted. Now at this point you think I would of caught a break and the rear BRE spoiler would fit perfect? NO not the case, the over-hang sections of the spoiler that fit over the top of the rear fenders actually hit the body when you closed the lift back not be just a little but a lot – Not Made for Datsun 260z 2+2 as promised, that’s 2 for 2 MR. BRE! Anyway! lets get on making the adjustments. I mounted the spoiler to the liftback securely via the bolt which were anchored into the structure of the spoiler, just had to make sure you drill the holes in the perfect location. I also used silicon underneath as I didn’t want water getting under the spoiler an causing problems. Then came the long arduous task of hand sanding the overhang sections to the right shape and height to suit my car this took a while – hmm just sent the bill to BRE right !!!! I needed to take of about 1cm on each side to get it right, it’s a nice custom match the car now but extra hours of work I could done without.

-
What else – I got the door cards and rear seat and sun visors , rear seat passenger wall cards and new transmission tunnel cover done a John/James Gadenne Car and Boat Upholstery (Sunny Coast Area) great guys super helpful and accommodating. I got the same texture and style or PU vinyl as the aftermarket seats with a similar pattern sewn into the door cards and rear seats so everything is matchy/ matchy looks factory. My original seats where pretty toast and wanted something with a bit more comfort and support got some Autotechnica Seats with a classic look and Australian Standards approved with tilt forward option, also added a air adjustable rear lumber support to the drivers seat. The Carpets I bought a complete set from Stuart at Aus Classics down in the Dandy area of Melbourne before I moved up to QLD anyway this is bit of vent I guess the whole build could be described as a vent now I think of it? Anyway Stu promoted and said he could supply a complete carpet kit for car but when it came to fitting it a couple of years later, their was not tunnel cover at all? The front floor mats didn’t fit, the side skirts where not cut with right cut outs in them, the rear mats couldn’t fit at all, the rear lift back did fit about 90% correct – so almost a complete waste of money really,could of done it better buying a roll of black carpet and doing it my self. Rang Stu said I was disappointed in the what he delivered, he said it was standard for Z – complete carpet kits to not come with the tunnel cover as its normally vinyl – mind you when you look at the kits out of the USA the come with the tunnel covers - he should probably should of specified that when selling a complete carpet kit for the car that it comes with no tunnel cover – I thought it would have been getting a carpet one at least, anyway not going to supply one to me now, he said send down template for the rear mat shape and he would send up some new mats for the rear, I did that three months later no mats not returning calls or emails now – TOP BLOKE – Anyway you going to get the odd bad apple just disappointing that they wasted your time and money. Interior side skirts I did a carbon fibre skin on and the same for the recessed panel that fits into the inner surface of the lift back. When it came to fit the Sun visors back it the bracket that holds the end of the roads and also the socket for the rear vision mirror cracked in half - murphies law again! - so epoxied them back together in sandwich with new metal base plate and top plate the sandwich ensures increased strength as the whole thing is bolted and bonded together once fitted. Door Handles were showing their age somewhat and were deflated and shrunken a little, tried to source some new ones but could not find any apart from similar second hand items, so I got this super sticky rubber glue/filler bonds quickly and dries hard. I injected into the vinyl casing that makes the handle assembly and also used zip ties to pull back the internal metal plates to bring back the proper shape and improved fit of the handle to the door – and it all worked well actually . They are not new but they look pretty good for a car 44year old car.
-
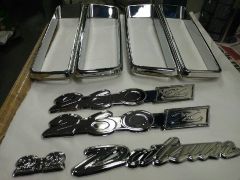
What Else - Fresh Chrome for the badges and rear tail light surrounds - Also Made a custom DATO badge - because thats what we call in Australia - Found some flexible ruberized sandpaper at bunnings which was really good for detail work and scuffing up the chrome sections that were to be painted black. Painted up the DATO badge so it Red on Top Blue on on bottom like the engine and the front Grill - bit of a theme for the DATO. Lots of detailed masking - FUN, I could not buy 260 badges anywhere new.
-
If that wasn’t enough I also did the rear inside hatch panels and the tail light covers and internal panel – yes I am really crazy. All these panels were even more stuffed than console and pretty unobtainable, well my car didn’t come with them all - so then I sourced some second hand they were nasty but it gave me something to work with so - no choice really. With inner panel on the aerial side I also incorporated a depression for the stereo amp to sit in – I also elected to take out the spare wheel and make into bass box – got love bass. Made a fibre glass mould of the spare wheel hole and then glued this to round MDF cover wasn’t to hard actually. Just going to have use tyre plugs and Slime Tyre Sealant and electric compressor on board if I get flat. Also did Carbon Kevlar door skin on the Glove Box and added a kick Ass surface mount LED Light that has some serious illumination. The Dashboard above the glove box has a rectangle slot for a Datsun logo to go into it – could not source one so I made one: Step One made Plasticine mould of the slot, then covered with surround wrap then did a mould of that with Plasticine and the pulled that of with some distortion and the reshaped to near the same as the slot in the dashboard - took some Vernier measurements to get exact as possible to the original slot, bought a Datsun vector on line in the style I wanted and then reformatted the size I wanted print off on photographic paper with a ink Jet Printer then sealed in a laminated plastic. Then uses a clear epoxy stuff to fill the mould, half fill then lay the logo on top the fill the last half and then wait for the whole thing to dry then polish and sand to fit the slot – Hmmm good use of time probably not – but its done! What else – Umm put in Door Still lights that are LED open the door shine straight down illuminate the area under the door so you don’t step in puddles or ding a door.
-
Yes i AM still here even COVID could kill me !!!!– Its been a while – still got some sanity but the last 15% of the build is TOUGH - REALLY TOUGH - putting together all the different layers of the build into its final configuration you find out what’s lost what’s broken - then seeing if you can buy a replacement second hand, new or what you will have to re-fabricate??, it is complex and time consuming and frustrating and then you get the layers wrong and have to re-do work needlessly. Lots of workshop manual checking – lots of reference photos checking and then still not finding all the answers, surfing the net for answers – its fun - really fun! This was bit of project!- if you thought the fuel tank saga was long this may of be 3-5 times longer - the centre console was cactus – cracked warped discoloured – I also wanted to fit in a double din stereo and drink holder – we are civilized now and we sit in traffic! Don’t forget a Mobile Phone holder and USB charging enabled! They old console was not going to hold up to patching and such radical modifications, I should of and I will say this again and again and again – DO NOT TRY TO DO THIS - buy a complete one out of the states in Carbon fibre it might not be the design and spec you want but the time it took to create was staggering. So I knew what I wanted so used Aluminium tape and a Dremel with a circular cutting saw and modified the shape of the old console, I dropped the floor of the console to make room for the double din stereo, spread the sides, then cut a slot for the phone, filled in the slide back hidehole and put in a drink holder, relocated the HAZARD Light switch to the side of the console moved the demister switch. Reshaped the rear open tray so it had change tray and dedicated flip-top arm rest. Deleted that ugly ashtray in the back and make the whole thing slightly wider and about 100 times stronger. How do you do that ! Well start cutting sections of the original ABS plastic console and allowing the cut parts to hinge-out to where you want them – little bit of heat shaping as well with a heat gun, then holding then newly formed shape by using adhesive aluminium tape - amazing stuff. I had a big roll of the stuff given to me by my legendary grandfather who taught me plenty. Then smoothing and shaping with plasticine for the final exterior shape – I guess it’s a little like doing second generation modern upgrade to car body design. If you are feeling tired and distracted at this point and can’t read any more, completely understandable and if you are not - you have a sickness and should check yourself into the loony bin right now. Next part is making a fiberglass mould of the whole thing – I hate fibre glass it is god awful stuff - you can do amazing things with it but the mess the skin piercing itchy fibres are like a disease! Even with lots of wax applied to the inside of the mould before the application of the inner moulding process it still was really impossible to pull-out the moulded blank without killing the outer mould – lots of time, lots of swearing I apologize to the anyone who might have been earshot - I think I am black listed by the whole street now and they haven’t even herd the rumble of the DATO yet .. And that’s just the start ! of making the console - now lots of sanding filling and more detailed shaping of the inner blank, then reinforcing of the design. Putting the phone slot is cool but it weakens the design structure, drink holder is cool and refreshing idea but the parameters to get it to fit in the sunken slot in the transmission tunnel - just in the right location is close to impossible. Now the finish – a genuine Carbon Fibre 3000k finish/laminate – seemed like a good idea, but ideas are dangerous, especially in the hands of mad man. I got it to work, but not perfect – but pretty good – was it worth the time and angst ummm NO NO NO. You adhere and layer the Carbon fibre material to the outer surface of the console by using a carbon fibre two pack clear resin, first step is applying a layer of this stuff to the whole console and waiting for it to go-off to tacky then lay on the carbon fibre material and stick it down with out getting wrinkles or distorting the materials fibres as they fray apart under pressure when you ask to much of it. Is this difficult, YES very if you had a flat or simple structure not to bad but the console is complex shape and you are really pushing the limits of what is possible doing it free hand this way with a complex shape , you do have too cut paste some sections to get work and overlap in a way that it is not too noticeable with change in material direction/application. The best way would be really to vacuum pack it and compress everything down too smooth it out and remove the excess resin – I wasn’t comfortable with going that way seemed to be less control potentially and I didn’t want to buy the special vacuum ect and I was more comfortable with this free hand way. Once you have a nice smooth uniform coverage you then apply the two pack resin too the outside of the Carbon Fibre about 3 layers – I used the WEST brand , works pretty good Then more sanding and one day you finish. Don’t do it.
-
https://pin.it/6DzlyWV Hi Guys hope all is keeping well - this is a link above to Pinterest page that I have been building for a while. I guess really for it to be functional you have to download the app - Pinterest is a good tool or a way to fritter away time, something you might have while this Covid crisis is on. The page has 2300 or so images of Z cars which might be helpful if looking for ideas or inspiration. Cheers AK
-
STILL LOOKS GOOD
-
Hold me back - New Matchbox - ZERO to Flick Speed in Seconds
-
Hi Mate - Beggers can't be choosers to point - Black prefered but I could paint if not, condition as long as it is plausible to get them back into functional good looking condition
-
Hi Guys - I hope everyone is keeping well - Getting back into the Car Rebuild Need a little Help - Has anyone got some spare Datsun 260z 2+2 Interior Quarter Panels LHS and RHS, my car when I got did not come with unfortunately
-
Hi Guys - came across this one today - Nice Little Dato Story - New Z Car Hot Weels on the Way - https://www.facebook.com/donutmedia/videos/601493706914990
-
Yes times are changing without a doubt Good to beat back the rich oil barons who spend money with very little care about the average-joe and play their little stop and go strategies to force the price up of oil. Governments to TAX tyres massively moving forward could be a interesting one with e-cars becoming more in vogue (maybe we should stock up now on tyres) I wonder if tyres will become more expensive just in-time for Christmas?? Apologies for my cynicism. Honda is not far off a working 80% recharge in 15min 250km range - that starting to get more like it. There will be some trade off on the crash stakes as medium knocks to the chassis on e-car will damage the chassis floor plan where the batterys live making it a throw away they say - but with cars driving themselves they may become impossible to crash. Tesla says the next big thing is Electric Jet engines powering transcontinental planes and Vertical Lift planes ruining electric motors - times are really changing fast- if the electric Jet engine comes about commercially that will really will be a change to our dependence on the fire juice. I think its sort of good for the World in general the electric car but they are not super green yet, the batteries and where the power comes from not so green most of the time - but no fumes out the exhaust has to be a step in the right direction. If the electricity got the car without the need for a battery they would be so much better. I like my Z its raw and direct and you got to drive it, tame it, work with it - I not would change for it for a Tesla or any other e car.
-
Hi Guys Its been a while and I have been settling into the new digs in the sunshine coast QLD - life is tuff! But I can tell you the wifes Honey Do list has been TUFF and long and never ending since moving - residential paradise comes at a cost! Anyway work on the Z starts again finding all the parts and opening boxes whats this where does that #$%!! part go? MY GOD my hair should be falling out but no rush - got time now - want to get done pretty right. FRESH CHROME - Finally shoe-horned some 260z badges a lot harder to get hold of than those common 240 badges ha ha ha , The Dato Deck Badge and The Tail Light surrounds all got fresh Chrome. KICK ASS NOW - couldn't face putting on the tarnished ones back into service. $630.00 all up quality of work seems good Chrome Tech Unit 40, 5 Anella Ave Castle Hill NSW 2154 T: 02 9899 9122 F: 02 9899 1622 M: 0412 255 666 E: info@bronzingstudio.com.au & info@chrometech.com.au
-
-
-
From the album: AK 260 Z EVOLUTION
-
They are still the best no-doubt for classic Z
-
Lots of great input here from everyone - just level of discussion itself is enough to show that the bubble and demand is far from finished. Things like Electric Cars are more likely to shake up the market place - whether that makes fossil fuel burners even more lusted after will be interesting - I would be surprised if the value will slow It likely that 70's classic cars will be the pic because you have performance and bare bones character - I dont really understand the wooden wheel vintage car fascination apart from the historical master piece value, but from a driving point of view it still going to have that motorized horse and buggy feel and look - 80s on wards the refinements start water down the feel raw feel of what the car is and whats its doing and how its doing it ! Its all in the eye of the beholder to a fair degree - but no doubt the 70s Z Cars are Raw, Beautiful, Fun to Drive and have great Balance - That thins the herd a lot. 100k is could be achievable in a healthy economy no doubt and even then it will still be a far better car than some other cars that now sell for more take a look at the localized example of some of Holden Torana's Ford Falcons - Iconic raw cars no doubt but not in the same league as far being a vehicle with real Sporting Looks and Ability.
-
Hi Ben Nice work if it comes out like the Fugu it will be pretty crazy . Thanks for sharing the build AK
-
Hi Pete - thanks for the advice at the show - yep it did look a little doge - mine is even lower currently - cheers AK
-
Hi Dave / Guys - I might see if I can make it down if the wife's honey do list is not to big ! My Dato is not going yet!! but hopefully I will get back to it in a couple of months still settling into the new QLD digs!
-

L28 Rebuilt Engine, Mikuni Carbs, Clutch Etc - Complete
AK replied to 240Z_au's topic in Parts and Tools for Sale
Thats one clean engine - very nice! -
Over in the USA right now - so picking up few parts from Zdepot and MSA although MSA was out of 80% of what I wanted after placing the order - so lots of buying and not much fitting or reconditioning but I will be ready to go when I get some time when I get back to OZ. Yep your so right need a list and cross them off as I go. Well done on shortening the list. Cheers AK
-
Part 2 the fingers looser than the brain anyway typo from above - WOW - seems very weird to be typing 2018 - Happy New Year to everyone! - but it happens every year that typing the new date seems so wrong - anyway my beast is in that $30k bracket as well with Shannons so if you have a clean mean rust free machine thats what they are worth - they are irreplaceable after all I think 90k could be the upper envelope in the future - you could buy a new MX5 $30k + but that would be really boring in comparison !!!! AND it would only depreciate.
-
Hi GUYS Hope all is heading in the right direction for all the fellow Zers out their for 2018 WOW
-
Welcome Amar - Nice looking car has a cool vibe about it - like the shot in front of the prestiges old world fountain, will be interested to see more photos when the times comes. Cheers AK - well done on getting one of the very last in your country


