

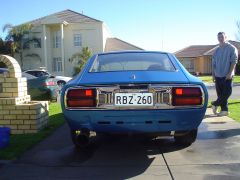
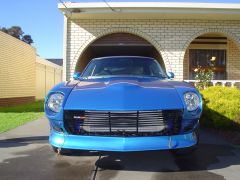
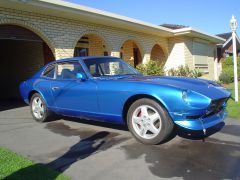
RBZ 260
-
Posts
1,286 -
Joined
-
Last visited
Content Type
Profiles
Forums
Gallery
Events
Articles
Media Demo
S30z Register
Store
Everything posted by RBZ 260
-
i think its more culture y people optioned for autometer. i have been an autometer fan till i took one apart. like i said ive seen and repaired few of them. once u take them apart u know what i mean. quality of both workmanship and materials is totaly different. when u take the autometer apart u feel ripped off that u paid $150-200 for a boost gauge. design of them is in the same era as our zeds if not older. that has maybe $3 worth of materials in total add another 10-15 for machining and design.but u wont think of the same when u open one of the apexi or greddy ones. lot more hours have been spent in designing them.and quality is exceptional. even on the inside. overall i guess they all point to a scale to give u a reading.y they use them cause they prob sponsored by them so they have to. ive noticed my autometer boost guage on different days gives different levels also temperature dependant. the apexi i had for 5yrs hasnt moved a mm in either direction no mater what the weather is like or temperature. how easy is to read an un illuminated needle on autometer?? i had to struggle to see if it was 10psi or 12psi. needle bouncing mad between the two figures. hmm exceptional engineering. NOT with apex with bright EL backlight and contrasting bright (glowing) red needle is far easier to read. also the annoying bouncing never happend and this was the el cheapo apexi that cost the same as autometer. the electronic ones are in different level again. if u have the autometer comp series with liquid.LOL almost everyday u have to bleed the sucker to give u the correct reading. in race car fair enough but as a daily its damn annoying. not saying autometer are crap just i think they are way way overpriced for what they realy are. VDO well most OEM stuff is VDO what else to be said. its done properly. have been playing with gauges for long time.have repaired and adjusted lot of them in my time. sorry for disaponting few ppl that have them but just talking from experience and feel sorry for people falling for autometer. dont see the reason besides the coulture or if u get them for free. my 5C worth.
-
James since u visit jap land frequently. if money wasnt object i would have gone for full APEXi EL setup or even greddy sorry to the autometer guys but jap stuff is worth the extra $$$ ive seen and repaired both of them. hence the reason. as for boost guage most boost controllers have them on board anyway so you dont realy need one. expecialy when they have record and memory read i couldnt afford paying full price from local boys for apexi or greddy so i made my own.you have seen it on thezgarage. i have a genuine greddy boost guage in one of the top pods. other two temp and fuel are r32 skyiline guages with greddy style facia to match the boost. speedo is n15 pulsar module with s14 200sx speedo sensor.again all with greddy styling rpm is r32 rev module with greddy style facia. other two guages which im going to position in front of the gear stick is volts and oil. all the guages have warning and all other light incorporated within. also have another cluster made up i called the "Z" warning center which looks like a guage but displays: door open, demister on, fog light on, security, handbrake and other stuff skylines come up with. though its taking me fair bit of time to finish them i can make another set.but prob be cheaper to buy all made stuff allready as im not paying for my labour. but it will be unique and factory like. if interested willing to help. with details.
-
cheers yeah 98% work was done by me. including paint and most of the mods. the ones i didnt do is the ones that required fancy expensive machinery. but still had mates rates so wasnt bad. yeah i was thinking to paint my 240z in the mazda vermilon red but changed my mind and porbably doing it in white pearl or mettalic. though that project is few years down the track. as for project cars is there such section
-
HMM that looks like a turbo stuck to it .interesting. obviously someone has done some work on it previously. also looks like its been on there for some time. its taking me 3.5yrs for to do my 76 2+2 and still counting. (though i had some other projects along side) also good to see another 2+2 getting some decent treatment. good luck with resto keep us posted. be interesting to hear how the engine runs with that setup. looks very simple and clean.
-
forum wouldnt let me post two at the same time so this an adition.

-
here are the pics. not exactly step by step but what i had on my fone. first one is afer the fiberglass was sanded and body filled to get the right shape and to remove the imperfections left by the glass work second one is 2pk primmed/filled third is black base coat with 2pk clear. looked crazy and very shiny. so sanded it down and painted it with viponds tautflex and finished product on the last pic. hope that helps bit more till i can dig out my other pics
-
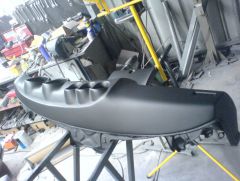
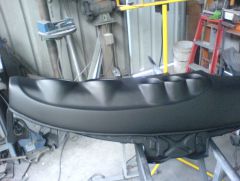
Yeah im here too hehehe sexual sushi!nah this is not the one thats on hybridz this is of thezgarage AUS got the idea from one of the members from here or z garage cant remember now. he was making fiberglass copies. and i asked him about the finish.and he gave me a product name that he was thinking of using. but hasnt used yet. the finish is VIPONDS TAUTFLEX about $35 per 1L i only used maybe 200ml for the dash. its australian made product UV resistant and all other magic stuff they say it does. i didnt believe in it but a got it to try it out. The dash itself was a mess. i will put a pic of it when i started. it had 6 cracks accross, huge ones accross the 3 center pods gap of almost 2.5cm two other cracks on the speedo and tacho pods and a huge one accross the glove box lid. in other words it was CRAP. attacked it with 36 grade sandpaper with long plank as a sanding block. that removed the cracks being out of the line. by doing this i made the gaps even bigger.by removing the sunburnt part of the sponge till it got to nice and clean sections. Filled the gaps with expandable foam or space invader. let it dry. than attack it again with 36 grit paper till u get the basic shape into place. once happy with the finish. i used few sheets of fiberglass and resin and layed it acrross the repaired area. didnt go all around as there was no reason. the sun dont get there anyway. so just do the top half. after that guess what more sanding when the fiberglass cures. again get it into a nice shape if holes are not perfect circle use a plastic or steel pipe covered in electrical tape and fill the imperfections with fiberglass. other option is at later stage to use body filler. once the holes and the dash is in good shape. sand the whole thing including the original vinyl with 180grit. if any imperfections use body filler to get small imperfections out. finilise with 240 grit. next step is i used 2pk primer/filler in very thick ratio. no thiners just hardner. called maxi fill. primer used was dupont. same stuff used on the car. basicaly apply a fair bit of it to fill all the original vinyl pattern.do same for the glove box cover but before using the max fill primer/filler use plastic primer on it. give it few days to dry properly or if ui fortunate enough to have a huge spray booth with heater drop it in there. i left it in trhe shed for 5days and on sunny days left it on the sun to bake properly. once dried more sanding this time with 400 wet or dry if lot of imperfections otherwise use 800wet or dry. an extra step i did which is probably not necessary is that i painted it with black base coat with 2pk clear. this is probably an overkill. main reason i did if there is a chip of the taut flex i stil have strong black underpaint and not having gray primer showing. i left it again for few days to dry before sanding it with 1000grit and painting ti with tautflex. if u want the smooth finish than spray normaly. i still wanted the suade finsih so i sprayed it from a distance to give that unique rough texture. i let it dry overnight.it felt like suede lether it almost smells like it too. i tried scraping and digging in with nails to see how strong it is. no mark left on it. few spots i had very rough finish use a cotton rag with water to make it bit smoother. till the lint from rags wasnt left on the dash. once dried it still looked great. i had all the bits at home when i did the car. like primer and clear. but you dont have to use 2pk. it is lot stronger than acrylic but should still work good. i got the information from few dash restoration places on how they fix the dash. its the same way except they use body filler and some may use glass to get the shape and then cover it with vacumised vinyl. i think having a fiberglass cap on top will last lot longer than those recovered ones. and if u get it damaged its easyly fixed and touched up. also the viponds comes in any colour you want as they can tint them too. u can get vipond tautflex from bristol paint or google viponds for other locations. total cost $35 for viponds tautflex can do lot of dashes with 1l $30 worth of fiberglasss $10 worth of primer $10 worth of clear and black base coat $10 for sandpaper and bit of your own time doing it. plus other equipment needed for spray painting etc... its not a original look but its definetly different and very adaptable to any changes u wish to do on the dash. extra pods or mods. even the dash restorers dont reskin with original grain but a vinyl look. its out there for people to try out. if u got a crapy dash give it a shot u be suprised how well it turns out.
-
From the album: RBZ 260
-
From the album: RBZ 260
Different view of DIY restoration -
From the album: RBZ 260
another pic another angle -
From the album: RBZ 260
-
From the album: RBZ 260
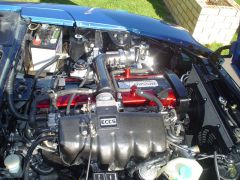
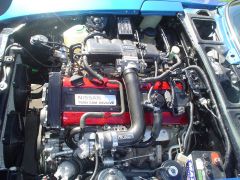
it is silver rb20det. covers painted in marble red. also since my last mishap with the car and my water pump blew out of the enigne taking out the radiator. since than new r32 radiator and mechanical fan replaced with twin 12" electric. -
From the album: RBZ 260
Well this is the finished product of my DIY dash restoration. turned out lot better than i thought. viponds magic worked. saved a fortune doing it myself. for details please check www.thezgarage.com -
From the album: RBZ 260
As some guys will notice the slot for badge has been changed to suit one of these. -
From the album: RBZ 260
-
From the album: RBZ 260
just a temp fix of my rear light. still on the work for the r32 rear.will remove the chrome garnish and replace it with black items. anyone interested let me know in the chrome items. -
From the album: RBZ 260
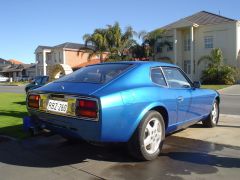
The mean looking front end with shiny cooler poking underneath -
From the album: RBZ 260
nice day for pics -
Yeah not the 84 celica it will be too big for 2 seater. But maybe 1986 or even 1990s one. the 1990s one have very small roof and failry simila curves. and from memory they are metal as well. Also the 1990s one has two modes. the small lift up or complete slide inside. on my white 240z i got sunroof too pop one, though its in good condition and doesnt leak and looks good from the inside. :evil: im eather going to weld it up (if the car is to be retained as close to stock retro) and if not i may do the same trick to it as i did on the 260z. im seriously thinking making the 240z a crazy animal with most probably with gtr runing gear including the 4wd setup. have to give other gtrs, wrx,evos and turbo porsches run for their money. :twisted: next project when i move in my new home. got tons to do for next 2 years. before even looking at the 240z.
-
Got it from Nissan. i think LHS was in stock in melbourne and the other one came from japan within 4 days. Got to love nissan parts delivery one of the best in OZ. price was 110+gst for the one that was local and $140+gst for the one from japan. ill post the part numbers. they did say that one of them was going to be obselete very soon as the number were very low.
-
more pics
-
Finaly got some time to post about this since few ppl asked to do so. As most of you will know the car came with a crapy pop glass sunroof which i hated. At the time finding replacemnt roof was difficult and wasnt looking forward in replacing it anyway. One morning woke up and idea came to me to use a sunroof metal type one from another car and fit it into the 260z. In Adelaide we have these self serv wreckers with lot of old cars. lucky for me that day there was a 260 2+2 and handfull of old cars with metal sunroof. the one that cought my eye was the 1984 toyota celica. roofline was similar as well as the size. few quick measurments seemed to be good fit. quick grinder chop and $60 after i was on my way home to start installing. the new sunroof cut out was bit larger which was good in a way. ive unspoted the reinforcement from the celica roof cut around 3cm from the edge of the celica sunroof squared it up on the 260z roof and marked it out. After that a jigsaw did the hole enlargemnt. once the hole was made the small part of the original celica roof (just 3cm around the sunroof hole) was placed in and spot welded in few spots. every 5cm or so to stop heating the metal and causing it to buckle. next step welding the rest of the sunroof lip was time consuming. as i could only weld not more than 2cm at the time and than shifted on oposite side to give time to cool down to stop buckling.it worked but took a while. After that was a matter of installing the subframe with the motor and slides few mods just to help it go with the curves of the 260z roof line 3 holes on each side for rivet thread to be installed on the A frame.this is to bolt the original celica brackets to side of the frame for reinforcment. the rest is bit of alignment and smoothing out the edge with tiny bit of body filler.
-
Yep they do look good. i got my self a set but matt black ones from nissan. bit pricey but they sure look good. and they are original nissan (well fairlady Z) ones. want the JDM look on my 240z hence the stupid reason for paying over $270 for the two.
-
I just got the rear window seal from rare spares $139. In adelaide we got this mob called "Fitch the rubber man" i got from them the chrome outeer strip seal that seals the glass to the chrome strip 27 each. rare spares want like 50 each. rear hatch rubber i got it off U12 Pintara of wreckers. the rest of rubber ill be getting form fitch as they have almost every profile under the sun. other stuff like the rubber that is cliped infront of the door where the window frame bolts up to u can get from nissan $30 each.
-
heheh whats this going over 200km/h thing on here with old z. ill give it a shot on a "race track" :roll: when mine gets on the road but having 4.4 diff may be strugling a bit but hey will get there quite quickly. one way to find out. As for sunroof Toecutter i started to do it the other day but my crapy internet died half way through it and lost all the crap i wrote. so i only added few pics in the gallery ill try again. hyundai yeah very nice looking car pitty its front wheeler and got that badge that looses more money per week than can go fast.


